With this Developer-Kit you have the opportunity to develop your own plugins. Download our Developer-Kit and get started! All plugins have to follow to the guidelines and license agreements of doitclever.ch. All rights reserved.
More Plugins
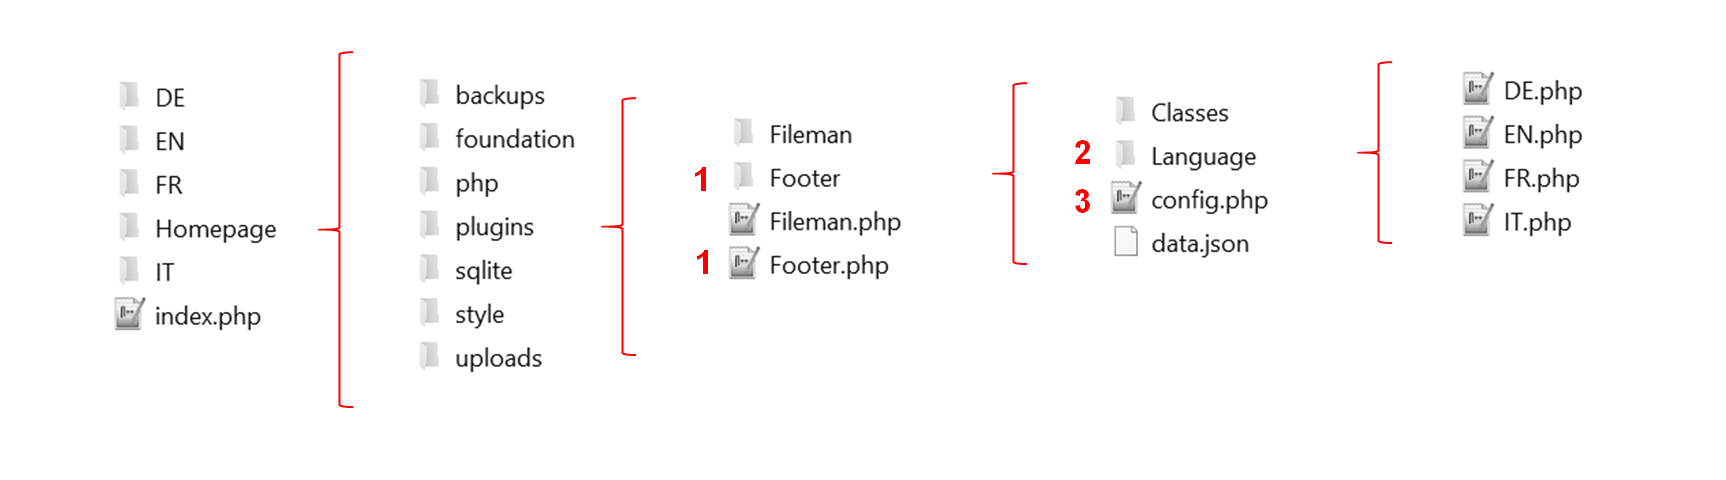
Each plugin needs its initial file 1 and a corresponding directory 1. The name of the initial file (in this example "Footer.php"), can be named individually as long as the corresponding directory has the same name (in this example "Footer"). Only in that case your plugin will be loaded correctly.
Your initial file 1 is either loaded on a page where the plugin was placed (only possible in our live system) or, if the developer mode is activate, automatically loaded on all your pages. This mode is recommended so that the initial file is always loaded directly (see above).
Inside your plugin directory 1, a language directory 2 and a config.php file 3 must exist. The language files inside this directory (DE.php, EN.php, ...) will contain all language relevant expressions for the config.php 3 and also the initial file 1.
Your Developer-Kit is now ready to automatically load your plugins and disable the security mechanism locally. You will find these settings in your global config.php file of your test website:
http://localhost/Homepage/php/Configuration/config.php
To load all your plugins without specify them, it is sufficient if you change the following line in your global config.php. If you change this line, all your plugins will automatically be included on each of your pages.
define("KONST_developer_mode", "yes");
Each plugin also has its own config.php file, which will display your plugin settings as a GUI to your users. This config.php is normally protected by our login system. So that you are able to open your config.php file without authentification, you have to change the following line:
define("KONST_inactive_plugin_safety", "yes");
In our live system a plugin specific config.php file will be displayed automatically to its users, if they click the button "Settings" right besides the plugin. So this file is directly visible to your users. Therefore, you should consider the config.php as a small GUI, which is available to your users. This config.php is usually protected by our login system. In your test environment, this config.php file can also be called without an authentification, as long as the lines of developer mode are activated (see above).
Open your corresponding config.php of your plugin like this:
http://localhost/Homepage/plugins/Footer/config.php
You can also change the language of your config.php file by appending a URL parameter:
http://localhost/Homepage/plugins/Footer/config.php?language=EN
To load all required scripts of your config.php file and to protected it by our login system, you have to include two files. These must necessarily be integrated at the beginning and at the end of your config.php file:
	require_once('php/Configuration/start.php');
	...
	require_once('php/Configuration/end.php');
Between these lines you can now program your own lines. Please make sure you use the style library called "Foundation Framework" for your HTML styling. All information can be found HERE.
It may be that a website supports multiple languages. Example doitclever.ch/DE or doitclever.ch/EN. If a language changes like that, also change the paths of your initial file are changing. So you don't have to worry about this, you can just append this parameter to any file path who gets loaded from the initial file:
	LANG_path (Muss jedem Pfad angehängt werden, welcher innerhalb der Initialdatei geladen wird)
	z.B. $html->get_data(LANG_path.'Homepage/plugins/Footer/data.json');
The following parameter will always contain the currently language, for example DE or EN. You can use this parameter, for example in a query to your database:
	LANG_current_language (Current language like DE,EN,...)
	KONST_page (Current page id, like 1)
Please always use a plugin specific SQLite database. Alternatively, you can work with JSON Files (for example like the Footer plugin). However, JSON files only makes sense for a few records. If you decide to use a SQLite database so please save it like this:
http://localhost/Homepage/plugins/Blog/db/blog.db
To be able to access your plugin SQLite database, the PDO interface is excellently suited for this purpose. This is supported by XAMPP and almost all hosting providers:
	$db = new PDO('sqlite:'.LANG_path.'db/blog.db');
	$db->query("SELECT * FROM blog WHERE language = '".LANG_current_language."';");
There are a few additional files which will be loaded automatically in your index.php file, if they exist. For example, if you want to load an additional CSS file for your plugin, just create a file named like this:
http://localhost/Homepage/plugins/Footer/css/style.css
You can also add more meta-data or load scripts which will need to be loaded before the body tag.
http://localhost/Homepage/plugins/Footer/meta.php
Please note that jquery will be loaded only at the end of the body tag. Therefore it makes sensce to integrate javascript files or other skripts right after. The following file is automatically loaded after the jquery library, if it exists:
http://localhost/Homepage/plugins/Footer/paths.php
Please make sure that all uploaded files, which a user could probably upload over your config.php file inside your plugin, are saved in the global "uploads" directory. As a result, the user can also access this data over his filemanager. Ideally, you create automatically a new directory with the same name as your plugin, if your config.php file get openend the first time:
http://localhost/../Homepage/uploads/xy/
If the Fileman plugin is available (should already be included in your Developer-Kit), you can also use the CK editor and the file manager inside your plugin config.php file. If the Fileman plugin is available then you can add the following class to your textareas:
... textarea class="ckeditor" ...
If you now want to insert images with the CK Editor, the Fileman plugin offers a method which should clean automatically all entered image paths. You should use this method to clean up your content, sent by the CK editor before you save it into a SQLite database or a JSON file.
	//If the plugin "Fileman" exists, this method will change image paths to relative paths
	if(file_exists('Fileman/Classes/ClsFileman.php')){
	   include_once('Fileman/Classes/ClsFileman.php');
	   $fileman = New Fileman();
	   $data = $fileman->clean_code($_POST['code'],'save');
	}else{
	   $data = $data;
	}
To make sure your code from your plugin database will be also displayed correctly, you should use the following method:
	$fileman = New Fileman();
	$data = $fileman->clean_code($html,'get');
A plugin can also be accessed via short view function. For this the following file is necessary:
http://localhost/../Homepage/uploads/Pluginname/view.php
The view.php file is often identical to the config.php. Make sure to include all security mechanisms here as well.
If this file exists, it will be loaded on all pages on which the plugin got activated. The view.php is loaded into an iframe, which can be called directly right besides its regular content.

If the view.php got loaded from the short view iframe, the following parameters are automatically appended to the file url. These can now be intercepted and read out with the plugin.
	shortcut=yes *This plugin was called by a shortcut
	page=61 *This plugin was called from page with the ID 61
To store these params permanently you have to save them by yourself. You can store these parameters in a session cookie, for example, and read them again and again.
	if(isset($_REQUEST['page']) AND $_REQUEST['page'] != ''){
		$_SESSION['page'] = $_REQUEST['page'];
	}

	if(isset($_REQUEST['shortcut']) AND $_REQUEST['shortcut'] != ''){
		$_SESSION['shortcut'] = $_REQUEST['shortcut'];
	}